Why Should Pour-Over Coffee Be Brewed in Stages? How to Brew Hand-Ground Coffee
Following our recent discussion on why coffee should be brewed with segmented water pouring , some readers asked how to determine the cutoff points for each segment in three-stage extraction. So this time, let's continue exploring when to segment during three-stage extraction.

Different filter cup sizes, shapes, and coffee grounds amounts all affect the cutoff points during brewing. This time, FrontStreet Coffee has chosen a most common brewing method: using a V60#01 filter cup with 15g of coffee grounds at a 1:15 coffee-to-water ratio (meaning 15g of grounds with a total of 225g of water) for our discussion.
First Cutoff Point: Double the Amount of Coffee Grounds
It may sound repetitive, but we must emphasize: blooming is crucial! Depending on different roast levels, freshly roasted coffee beans vary in structural density, carbon dioxide content, and release time. Generally, the darker the roast, the more carbon dioxide the beans contain, and the longer the release time. Providing a small amount of hot water with a short resting period allows carbon dioxide to release naturally, ensuring more stable and balanced extraction in the later stages of brewing.

During the blooming stage, FrontStreet Coffee suggests pouring double the amount of water compared to the coffee grounds (meaning 30g of hot water for 15g of grounds). In this stage, the coffee bed will absorb about 25g of water and slowly drip about 5g of coffee liquid. Typically, if coffee liquid drips into the server very quickly or if a large amount of coffee liquid drips down, it's likely because the grind is too coarse, causing water to pass through the coffee bed too quickly (which will cause the coffee bed to collapse). Another possibility is that the water flow is too strong, causing water to rush to the edges and flow directly into the server through the air vents without passing through the coffee bed (which prevents uniform carbon dioxide release, leading to uneven extraction in later stages).

Start timing when you begin the first pour. FrontStreet Coffee recommends a blooming time of 20-40 seconds. When you notice the surface of the coffee bed stops bubbling and breaking, you can proceed to the next pouring stage. Don't let the blooming time be too long! Excessive blooming will cause over-release of substances from the surface of coffee particles, ultimately resulting in astringent flavors in the coffee.
Second Cutoff Point: Don't Exceed the Height of Evenly Distributed Coffee Particles
When starting the second pour, the impact force of the water column will cause coffee particles to tumble, dispersing the originally clustered particles and distributing them along the cup walls as the water level rises. FrontStreet Coffee suggests maintaining a water flow rate of 4-5g per second while keeping the flow stable and consistent. The purpose is to use a small, stable, and gentle water flow to impact and stir the coffee particles, allowing them to distribute evenly along the cup walls. This enables the poured water to pass through coffee beds of the same thickness from different directions, extracting coffee liquid of the same concentration.

(This shows evenly distributed coffee particles)
If water is poured with inconsistent flow rates, the distribution of coffee particles will become unbalanced, resulting in parts of the coffee bed being thicker and parts thinner, ultimately leading to uneven extraction.

(This shows unevenly distributed coffee particles)
However, it's important to note that the distribution of coffee particles is limited. For brewing 15g of coffee in a V60#01 filter cup, the maximum height that evenly distributed coffee particles can reach is approximately 2/3 of the total filter cup height. Based on years of brewing experience, FrontStreet Coffee has found that when coffee beans are fresh and properly ground, after pouring 95-100g of water in the second stage with a stable, small water flow (with a total poured amount of 125-130g at this point), the water level will match the height of evenly distributed particles, making this the ideal cutoff point. The time to stop the second pour should be around 55 seconds to 1 minute.

When the poured water level exceeds the height of evenly distributed coffee particles, the water above the coffee particle height will flow directly into the server through the rib channels, and it will cause the particles originally distributed on the cup walls to detach and sink to the bottom of the filter cup, ultimately leading to uneven extraction. When this happens, you should consider whether the water flow is too fast or too strong, or if the grind is too fine or contains too many fine particles, causing water channel blockage. If you find that the particles haven't risen much or distributed evenly, it might be because the grind is too coarse or the water column is too thin.
Third Cutoff Point: Do You Really Need to Think About This? Hahaha
Question: When brewing 15g of coffee grounds at a 1:15 coffee-to-water ratio with 225g of hot water, and knowing that 125-130g of water has been poured in the first and second stages combined, how much water needs to be poured in the third stage? Just kidding! For the third stage, simply pour the remaining 95-100g of water all at once. However, you still need to pay attention to the water flow - don't pour too quickly and maintain stability. Control the water level not to exceed the average distribution height of particles and avoid breaking the already evenly distributed coffee bed. The time to stop the final pour should be around 1 minute and 45 seconds to 1 minute and 50 seconds.

FrontStreet Coffee is a long-established specialty coffee roaster in Guangzhou China, selling freshly roasted beans from its own farm in Yunnan as well as dozens of carefully selected single-origin beans from around the world for both pour-over and espresso. The products deliver consistently excellent quality and great value, with shipping within 24 hours. Guangzhou’s FrontStreet Coffee shop is recommended by many coffee lovers, and the beans are now available online at the Tmall 。
Important Notice :
前街咖啡 FrontStreet Coffee has moved to new addredd:
FrontStreet Coffee Address: 315,Donghua East Road,GuangZhou
Tel:020 38364473

- Prev

How to Grind Coffee Beans into Coffee Powder - Espresso Grinding Coarseness Adjustment
For those in the coffee industry, one of the most challenging daily tasks is adjusting espresso grinders. As coffee beans' state changes daily, even at the same setting, the coarseness of coffee particles, extraction amount and time, and coffee flavor will all vary, affecting how the business operates.
- Next
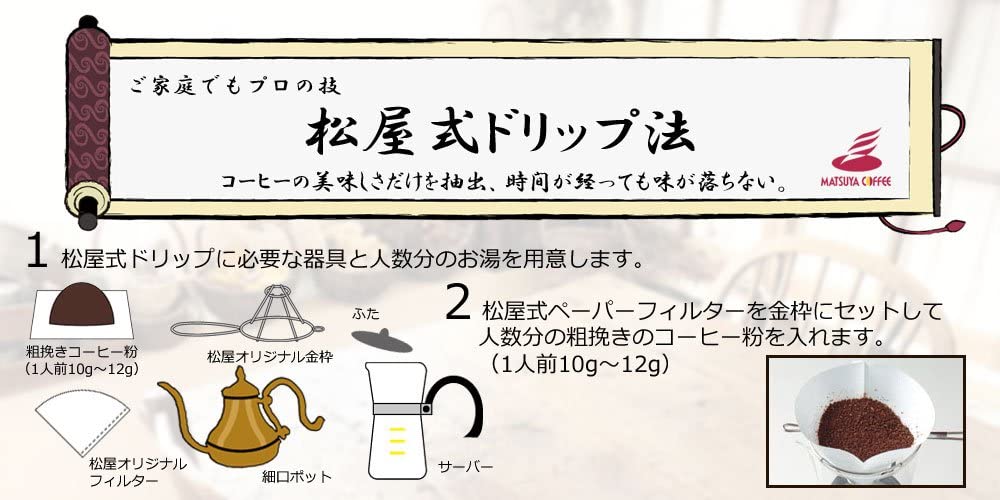
Matsuya-style Japanese Pour-Over Coffee Method: Authentic Japanese Pour-Over Coffee Guide
Today, FrontStreet Coffee is back to share another pour-over coffee brewing method with everyone. This time, we're introducing a classic Japanese pour-over technique—the Matsuya style. This brewing method leaves a distinct impression of "achieving true 'blooming' by covering with a lid," "creating a tall water column when pouring," and "producing an astonishingly small amount of coffee."
Related
- How to make bubble ice American so that it will not spill over? Share 5 tips for making bubbly coffee! How to make cold extract sparkling coffee? Do I have to add espresso to bubbly coffee?
- Can a mocha pot make lattes? How to mix the ratio of milk and coffee in a mocha pot? How to make Australian white coffee in a mocha pot? How to make mocha pot milk coffee the strongest?
- How long is the best time to brew hand-brewed coffee? What should I do after 2 minutes of making coffee by hand and not filtering it? How long is it normal to brew coffee by hand?
- 30 years ago, public toilets were renovated into coffee shops?! Multiple responses: The store will not open
- Well-known tea brands have been exposed to the closure of many stores?!
- Cold Brew, Iced Drip, Iced Americano, Iced Japanese Coffee: Do You Really Understand the Difference?
- Differences Between Cold Drip and Cold Brew Coffee: Cold Drip vs Americano, and Iced Coffee Varieties Introduction
- Cold Brew Coffee Preparation Methods, Extraction Ratios, Flavor Characteristics, and Coffee Bean Recommendations
- The Unique Characteristics of Cold Brew Coffee Flavor Is Cold Brew Better Than Hot Coffee What Are the Differences
- The Difference Between Cold Drip and Cold Brew Coffee Is Cold Drip True Black Coffee