Espresso Coffee Etching Latte Art Tutorial - How to Practice Tulip Etching Latte Art

Professional coffee knowledge exchange, more coffee bean information, please follow Coffee Workshop (WeChat public account: cafe_style)
Coffee latte art has always attracted many young people. Beautiful coffee latte art may not enhance the taste of coffee, but it can put you in a good mood to enjoy this cup of coffee. In this issue of Barista Training, we will teach everyone how to create a rosette tulip!!
Preparation Stage
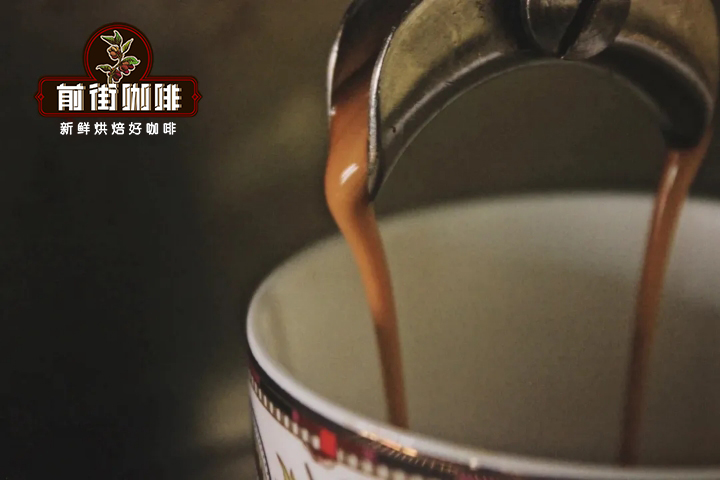
Two essential materials for latte art: espresso with moderate crema and fine, highly流动able milk foam. FrontStreet Coffee uses Sunflower Warm Sunshine Blend Coffee (Sherry Blend Red Cherry) for espresso, and the sherry coffee beans provide rich coffee crema.
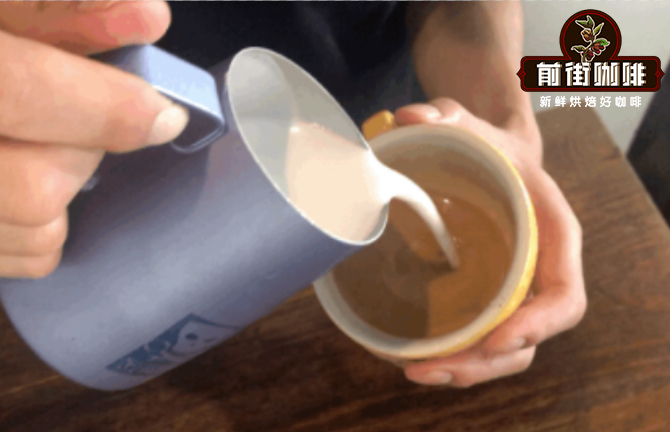
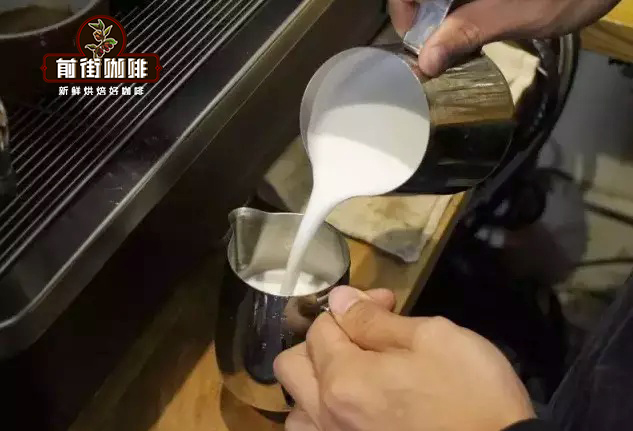
For milk, we use pasteurized whole fresh milk. The milk foam thickness is 50%, whipped to 60% full capacity, with strong flowability. Thinner milk foam has better flowability, allowing for the creation of beautiful lines for rosette patterns. Conversely, if the milk foam is too thick, it will result in poor milk flowability, making it difficult to create rosette patterns. For how to whip fine milk foam, please refer to FrontStreet Coffee's previous article [Barista Training | Teaching You to Whip Fine and Dense Milk Foam!!].
Latte Art Stage
FrontStreet Coffee uses a 300ml latte coffee cup, with espresso weighing 40g. First, you need to fuse the milk with the espresso. The fusion standard is that the crema is fully "stirred" evenly by the milk, the surface color is golden yellow, and no large air bubbles are produced. Fuse until the cup is 4/5 full.
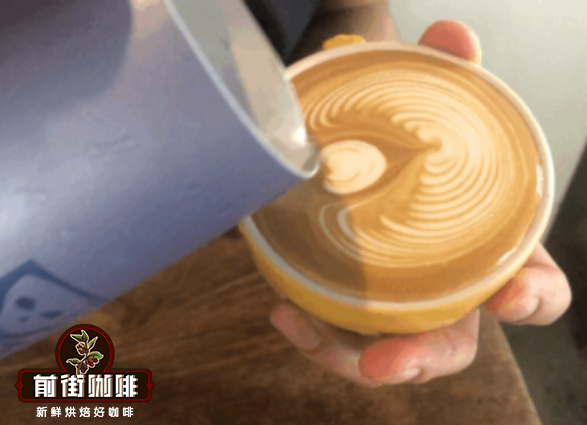
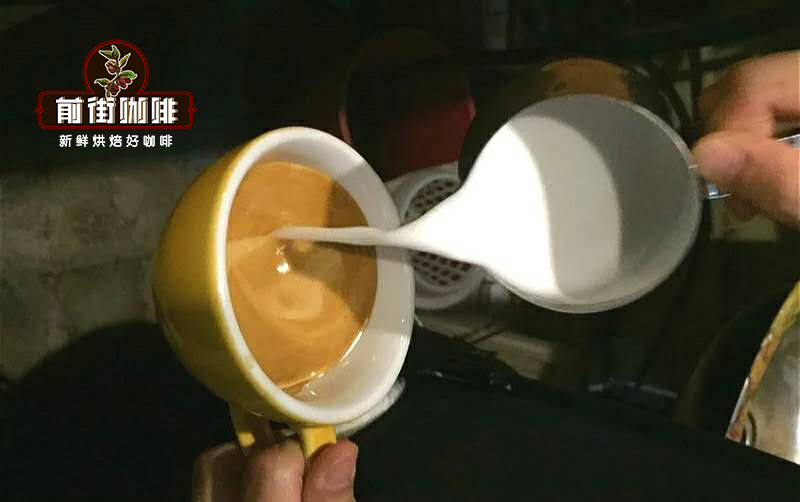
Next, start creating the rosette pattern. For the first rosette layer, the milk pouring point is at the center position. Keep the milk pitcher spout as close to the liquid surface as possible, while shaking evenly and slowly moving the pitcher spout forward, pushing to the center and then lifting the pitcher.

Next, repeat the same action, starting the pattern at 1/4 position, shake evenly while pushing forward, push to the center, and after being enveloped by the first rosette layer, lift the pitcher.
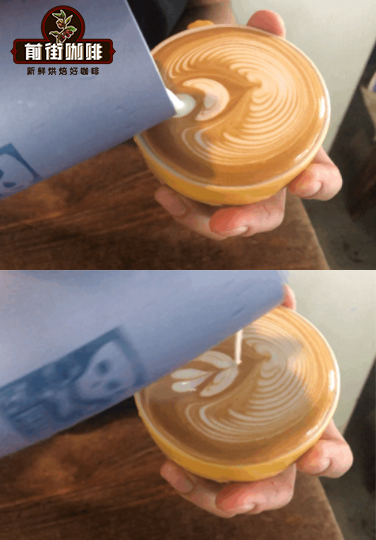
Finally, also at the 1/4 position, release a small heart shape at a fixed point, thin the milk flow, raise the latte art pitcher, move forward to the bottom of the first rosette layer, and lift the pitcher.
Important Notes
1. The milk foam thickness should not be too thick. Rosette patterns require milk to have good flowability; otherwise, it will be relatively difficult to create rosette patterns and beautiful lines.
2. The shaking amplitude should be uniform. The pitcher spout should be aligned with the center line of the coffee cup; otherwise, the created rosette pattern will lack symmetrical beauty.
3. Hold the coffee cup with your left hand and return it to an upright position at a constant speed, avoiding large amplitude shaking.
For more specialty coffee beans, please add the private WeChat FrontStreet Coffee, WeChat ID: kaixinguoguo0925
FrontStreet Coffee is a long-established specialty coffee roaster in Guangzhou China, selling freshly roasted beans from its own farm in Yunnan as well as dozens of carefully selected single-origin beans from around the world for both pour-over and espresso. The products deliver consistently excellent quality and great value, with shipping within 24 hours. Guangzhou’s FrontStreet Coffee shop is recommended by many coffee lovers, and the beans are now available online at the Tmall 。
Important Notice :
前街咖啡 FrontStreet Coffee has moved to new addredd:
FrontStreet Coffee Address: 315,Donghua East Road,GuangZhou
Tel:020 38364473

- Prev

Italian Espresso Rosetta Latte Art Tutorial - How to Practice Tulip Latte Art?
Professional coffee knowledge exchange, more coffee bean information, please follow Coffee Workshop (WeChat official account cafe_style). Latte art has always attracted many young people. Beautiful latte art may not enhance the flavor of coffee, but it can brighten your mood when enjoying this cup of coffee. In this barista training session, we'll teach everyone how to pour a rosetta tulip!! Preparation Stage Latte art has two
- Next

cofe+ Coffee Robot Makes Debut at Shanghai World Expo: Future Trends and Directions of cofe+ Coffee Robots
For professional coffee knowledge exchange and more coffee bean information, please follow Coffee Workshop (WeChat official account: cafe_style). According to CBS reports, China's coffee consumption has shown a clear growth trend in the past four years, with coffee imports growing 16% annually. Additionally, as China is one of the most populous countries in the world, drinking coffee has become a new lifestyle choice among young people in the country.
Related
- How to make bubble ice American so that it will not spill over? Share 5 tips for making bubbly coffee! How to make cold extract sparkling coffee? Do I have to add espresso to bubbly coffee?
- Can a mocha pot make lattes? How to mix the ratio of milk and coffee in a mocha pot? How to make Australian white coffee in a mocha pot? How to make mocha pot milk coffee the strongest?
- How long is the best time to brew hand-brewed coffee? What should I do after 2 minutes of making coffee by hand and not filtering it? How long is it normal to brew coffee by hand?
- 30 years ago, public toilets were renovated into coffee shops?! Multiple responses: The store will not open
- Well-known tea brands have been exposed to the closure of many stores?!
- Cold Brew, Iced Drip, Iced Americano, Iced Japanese Coffee: Do You Really Understand the Difference?
- Differences Between Cold Drip and Cold Brew Coffee: Cold Drip vs Americano, and Iced Coffee Varieties Introduction
- Cold Brew Coffee Preparation Methods, Extraction Ratios, Flavor Characteristics, and Coffee Bean Recommendations
- The Unique Characteristics of Cold Brew Coffee Flavor Is Cold Brew Better Than Hot Coffee What Are the Differences
- The Difference Between Cold Drip and Cold Brew Coffee Is Cold Drip True Black Coffee