Pour-Over Coffee Beginner Collection_Coffee Bean Recommendations for Novices_Essential Coffee Equipment Guide

Professional Coffee Knowledge Exchange
For more coffee bean information, please follow Coffee Workshop (WeChat official account: cafe_style)
Getting Started with Manual Pour-Over Coffee
New to pour-over coffee and want to try making it yourself? You'll need to prepare a thermometer, pour-over kettle, filter cup, filter paper, serving carafe, and most importantly—beginner-friendly coffee beans.
Pour-Over Kettles
Pour-over kettles come in two types: palace-style narrow-spout kettles and crane-neck pour-over kettles.
A. Palace-Style Narrow-Spout Kettle: The narrow-spout pour-over kettle is the most widely used coffee brewing kettle. Its water flow is finer, making it easier for brewers to control and manage.
B. Crane-Neck Pour-Over Kettle: This is a brewing device that only ultimate manual pour-over masters dare to attempt. It demands extremely high technical requirements for the brewer's water flow control. Recommended for those with extensive pour-over experience.
Filter Cup Categories
In terms of materials, filter cups come in ceramic, metal, resin, glass, and other varieties. Heat retention should be the primary consideration for filter cups, with ceramic being more insulating. From the perspective of filter cup development, the order of appearance was: single-hole filter cups (Melitta), three-hole filter cups (Kalita, inheriting Melitta's legacy), metal filters, V60, and cone-shaped.
A. Single-Hole Filter Cup: The single-hole coffee filter cup was invented by Germany's Mrs. Melitta. After blooming, water is added in one complete pour, and you're done when it finishes dripping. Light-roasted beans that easily clog the single filter hole are not suitable; it's mainly used for medium to dark roasted coffee, making it quite suitable for Germans who prefer dark roasts. The dripping speed is slow, making it easy to produce rich, aromatic coffee.
The Melitta pour-over filter cup was improved toward automation and, after countless improvements, finally achieved great success in the United States—becoming what we now see as the most popular American automatic drip coffee maker. However, if you disassemble an American coffee machine, the brewing principle invented by Mrs. Melitta remains almost unchanged to this day, with only optimizations to the filter shape and filter paper.
B. Double-Hole Filter Cup: The effect is between single-hole and three-hole filters.
C. Three-Hole Filter Cup (Kalita): Also known as the Kalita cup. Three filter holes allow air and water to pass through easily. Even if one hole gets clogged by coffee grounds, the other filter holes can still be used—this is a major advantage of three-hole filter cups, suitable for light to dark roasted coffee of various degrees. After blooming, water is added in three separate pours.
D. Metal Filter: I particularly like Swiss Gold, Chemex, and Timao.
Advantages: Compared to filter paper, it better retains coffee oils, original flavor, and rich body. Most importantly, it's environmentally friendly—one filter can be used for a very long time.
Disadvantages: Compared to filter paper, coffee grounds more easily enter the coffee liquid, and it's relatively expensive.
The picture shows Swiss Gold:
E. Cone-Shaped Filter Cup: (Cake cup)
The Role of Ribs
When brewing coffee using the paper drip method, the filter paper will stick closely to the filter cup wall. Without these ribs, after adding hot water, air can only escape from the filter holes at the bottom of the cup. The remaining trapped air will escape from the surface of the blooming coffee grounds, breaking a hole in the coffee powder surface. Cold air enters, the coffee cannot bloom properly, and the formation of the filter layer is disrupted.
Coffee filter cups, serving carafes, pour-over kettles, and other products don't have much technical content—there's no need to chase high-end brands. The focus should be on improving your brewing skills, unless money is no object. This is my personal advice—
Preparation Work
- Prepare a thermometer: Some pour-over kettles come with built-in thermeters, which is more convenient.
- Prepare a stopwatch: Most phones have timer functionality.
- Digital scale accurate to grams.
- Filter cup, filter paper, serving carafe, pour-over kettle.
- Coffee powder amount selection: You can use a 1:13 ratio of coffee grounds to coffee liquid (if it's coffee grounds to hot water, it's approximately 1:15). With other conditions unchanged (flow rate, brewing strength, etc.), you can increase the powder amount to adjust concentration.
- Coffee powder fineness: Can reference the coarseness of granulated sugar sold in stores. You can adjust based on the roast degree of the beans used—dark roasted beans can be coarser, light roasted can be finer. You can adjust the powder coarseness based on bean variety—high acidity can be finer, high bitterness can be coarser. The best approach is to adjust the final coffee liquid's taste by modifying powder coarseness. If you find the coffee too acidic, you can grind the powder finer; if you find it bitter or astringent, you can grind it coarser. Adjust dynamically.
- It's best to use a pour-over kettle to boil water: If you pour hot water into a regular kettle, the temperature drops very quickly. The pour-over kettle should have a lid—without a lid, the temperature also drops very quickly, and the temperature will be too low before you finish pouring.
- When starting practice, it's recommended to keep the water level in the pour-over kettle consistent: Ensure the pour-over kettle has 90% water capacity before starting brewing to help find your feel and control water flow.
- Brewing water temperature selection: The water temperatures below are reference guidelines that you can adjust based on your preferences and brewing habits.
When using the paper drip method, water temperatures between 82°C–90°C (mainly depending on the beans, this is just an example) best achieve flavor balance. Exceeding this temperature will make certain flavors too prominent, while not reaching this temperature will prevent extracting enough delicious components.
Good Posture
A. Maintain a good standing posture. You can maintain a straight standing posture with feet about 10 cm apart, or keep feet together with toes pointing 60 degrees apart. Besides standing straight, you can also have one foot forward with weight on the front leg for stability, while the back foot helps support and maintain body center stability. In summary, based on individual physical conditions and habits, adjusting to a stable and comfortable standing posture before operation is fundamental.
B. Hand position for holding the kettle. For beginners, pour-over kettles have considerable weight, and stainless steel handles can be slippery and unstable. Therefore, finding a suitable posture to securely operate the pour-over kettle based on personal operating habits is also important. I recommend holding the upper part of the handle in a "lifting the kettle" posture rather than a "raising the kettle" posture. Also, be careful not to let your thumb touch the kettle wall to avoid burns.
C. Distance between kettle and body. During operation, maintain a certain distance between your body and the counter to ensure adequate movement space but not too far—about 10 cm. This varies by individual. The filter cup should be placed about 10 cm from the counter edge. Too close or too far will make operation difficult.
D. Eye angle for watching water flow and coffee grounds. When looking down to add water, ensure the filter cup and coffee grounds are under your direct vertical gaze, rather than looking at the water flow or coffee grounds at an angle.
E. Force application when pouring water. Hold the kettle with your hand, but be careful not to use force with your fingers, wrist, or forearm. Keep your upper arm close to your body, using your upper arm strength to support the kettle's weight for rotation. Throughout the process, your forearm and wrist only serve as support and transmission. Avoid supporting the kettle body with your wrist—this not only causes shaky water flow but can also lead to strain injuries during prolonged work.
Blooming Principles
A. The main purpose of blooming is to form a good filter layer. A small amount of hot water penetrates all the coffee grounds, and after a brief rest, a filter layer forms.
B. Air between coffee particles expands when heated. The coffee particles themselves also release large amounts of carbon dioxide, creating bubble-like gaps between particles. These gaps help the coffee grounds form a uniform filter layer, providing the space needed for hot water to pass through. Externally, this appears as the formation of the so-called "volcano dome."
C. The gaps formed by good coffee blooming are approximately uniform. The flow rate of downward dripping coffee liquid is also uniform. If a good filter layer cannot form, the dripping speed will slow down, leading to over-extraction.
Blooming Precautions
A. Water flow needs to be gentle and uniform.
B. Too little blooming water means many coffee grounds at the bottom remain unsoaked, causing them to suddenly encounter large amounts of hot water during subsequent brewing, producing bubble expansion that obstructs stable filtration.
C. Too much blooming water causes the middle and upper coffee grounds to immediately produce large amounts of gas that remain in the middle layers, obstructing the pre-soaking of bottom grounds and causing excess hot water to flow directly along the filter cup wall into the serving carafe.
D. Poor blooming will also result in unclean coffee taste, primarily sour and astringent, making it difficult to express the coffee's inherent characteristics. The mouthfeel will be thin with irritation, and the aftertaste won't be rich enough.
Pour-Over Coffee Steps (Using Filter Paper as Example)
- Fold the filter paper, place it in the filter cup, and ensure it fits the cup well. Place the filter cup on the serving carafe.
- Rinse the filter paper and filter cup with boiling water, letting the water fall into the serving carafe to warm the cups.
- The entire pour-over process should be completed within 2-3 minutes, including blooming time.
- Pour coffee grounds into the filter cup and gently shake the cup to level the coffee grounds.
- Choose appropriate water temperature, referring to the water temperature selection described above. For beginners, it's best to have the same amount of water in the pour-over kettle each time.
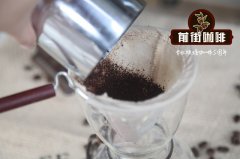
- Blooming: Gently, softly, quickly, and evenly sprinkle hot water over the coffee grounds—about 10ml. Keep the kettle spout 3-4 cm from the coffee grounds, starting from the center and spiraling 2-3 circles to ensure all coffee grounds absorb water evenly. It's best when 3-5 drops of coffee liquid drip down. The time for pouring plus blooming should be 15-25 seconds.
- First pour after blooming: Using the center point of the coffee grounds as the center, pour water in a circular motion with an appropriately fine water stream. Remember not to let the water flow directly touch the filter paper (otherwise the coffee will become astringent). Keep the circle within 1 cm of the coffee grounds edge. Maintain the water flow height about 3-4 cm above the coffee powder surface. The first pour should account for 60% of the total coffee water amount.
- After the first pour, pause briefly and start the second pour before the water in the coffee grounds completely drains. Use the same method as the first pour, accounting for 30% of the water volume.
- After the second pour, pause briefly and start the third pour before the water in the coffee grounds completely drains. Use the same method as the first pour, accounting for 10% of the water volume.
- When reaching the desired coffee extraction amount, immediately remove the filter cup, regardless of whether more coffee liquid can still drip from the filter cup.
Beginner Coffee Bean Brand Recommendations
FrontStreet Coffee's roasted beginner coffee beans: Yirgacheffe coffee, Panama Butterfly coffee, Indonesia Mandheling coffee, etc., all have full guarantees in terms of brand and quality. More importantly, they offer extremely high value—half-pound (227g) bags cost only about 80-90 RMB. Calculating at 15g per cup of pour-over coffee, one bag can make 15 cups, with each single-origin coffee costing only about 6 RMB. Compared to cafés selling coffee for dozens of RMB per cup, this offers exceptional value.
FrontStreet Coffee: A roastery in Guangzhou with a small shop but diverse bean varieties, where you can find various famous and lesser-known beans. They also provide online store services. https://shop104210103.taobao.com
FrontStreet Coffee is a long-established specialty coffee roaster in Guangzhou China, selling freshly roasted beans from its own farm in Yunnan as well as dozens of carefully selected single-origin beans from around the world for both pour-over and espresso. The products deliver consistently excellent quality and great value, with shipping within 24 hours. Guangzhou’s FrontStreet Coffee shop is recommended by many coffee lovers, and the beans are now available online at the Tmall 。
Important Notice :
前街咖啡 FrontStreet Coffee has moved to new addredd:
FrontStreet Coffee Address: 315,Donghua East Road,GuangZhou
Tel:020 38364473

- Prev
From Apprentice to Barista - Beginner Coffee Bean Recommendations _ Coffee Bean Knowledge Guide
Professional Coffee Knowledge Exchange For more coffee bean information, please follow Coffee Workshop (WeChat official account: cafe_style) Starting with beginner coffee beans Many people think that knowing how to make a cup of coffee means simply putting coffee powder into a cup, then adding water and milk to mix. In fact, this is a very common misconception that makes people think being a barista is an easy industry to enter. In reality, coffee
- Next

Best Specialty Coffee Bean Brands for Beginners_ Beginner Coffee Bean Recommendations_ Beginner Coffee Bean Prices
Professional coffee knowledge exchange For more coffee bean information Please follow Cafe_Style (WeChat public account cafe_style) 1. Specialty coffee is more than just latte art. Latte art is simply to make the coffee look more attractive, it's optional whether to pour latte art or not. Specialty coffee is essentially single-origin coffee with additional ingredients such as: milk, chocolate sauce, liquor, tea, cream, etc. Specialty coffee also
Related
- How to make bubble ice American so that it will not spill over? Share 5 tips for making bubbly coffee! How to make cold extract sparkling coffee? Do I have to add espresso to bubbly coffee?
- Can a mocha pot make lattes? How to mix the ratio of milk and coffee in a mocha pot? How to make Australian white coffee in a mocha pot? How to make mocha pot milk coffee the strongest?
- How long is the best time to brew hand-brewed coffee? What should I do after 2 minutes of making coffee by hand and not filtering it? How long is it normal to brew coffee by hand?
- 30 years ago, public toilets were renovated into coffee shops?! Multiple responses: The store will not open
- Well-known tea brands have been exposed to the closure of many stores?!
- Cold Brew, Iced Drip, Iced Americano, Iced Japanese Coffee: Do You Really Understand the Difference?
- Differences Between Cold Drip and Cold Brew Coffee: Cold Drip vs Americano, and Iced Coffee Varieties Introduction
- Cold Brew Coffee Preparation Methods, Extraction Ratios, Flavor Characteristics, and Coffee Bean Recommendations
- The Unique Characteristics of Cold Brew Coffee Flavor Is Cold Brew Better Than Hot Coffee What Are the Differences
- The Difference Between Cold Drip and Cold Brew Coffee Is Cold Drip True Black Coffee